Online Marketing 101: Running Successful Facebook Ad Campaigns
You’ve spent the last few weeks building your website and now it’s finally ready. Now the next question – how do you bring your shiny new website in front of people that matter most? That perfect audience that has been waiting to open their wallets and go on a spending spree on the goods or services you offer. And yes, you don’t really want to spend a fortune getting that audience to notice your shiny new website.
This short article provides proven steps I have taken in the last 4 years in running successful Facebook ad campaigns and hopefully, this works for you too!
Step 1: Starting from the basics – Set up your tracking pixel
First, you need to make sure you can track the performance of you campaigns. You can do this by installing the Facebook tracking pixel. There are several guides online on how to do this, but I’ll recommend the guide provided by Facebook. You can view that here: https://www.facebook.com/business/help/952192354843755?id=1205376682832142
While installing your pixel, you’ll need to pay attention to the type of events you plan to track. For example, if your website is an eCommerce website, you may want to set up product view, add to cart, order received events. If you’re looking to get leads from your website, then you may want to set up other events relevant to that. Once your tracking pixel is up and running, you’re ready for the next step.
You’ll also need to setup Google Analytics so you can track and analyse traffic patterns later. Here’s a link to a good guide provided by Google: https://support.google.com/analytics/answer/1008015?hl=en
Step 2: Your first Facebook ad campaign
Now that we’re all set up to track activities, we’re ready to start setting up ad campaigns. For your first ad campaign, the goal should be to get as many people interested in what you offer on your website as possible without breaking the bank.
The best way I’ve found to do this is target events higher up in your conversion funnel as goals.
Say for example, you run an ecommerce store. In that case, users first need to view your products, then add to cart, then proceed to checkout where they finalize and make payment.
In that case, your conversion funnel will be
View Product > Add to Cart > Checkout > Order Received
So for your first ad campaign, you want to set your goal to View Product.
This means you’re targeting those people who’re willing to just look at your product.
Once your ad goes live with this objective, your tracking pixel starts storing information about all that traffic for later use.
The most important part of setting up your ad is choosing which audiences to use.
For this, I’ll recommend a neat tool called Engine Scout. This short video gives a quick walk-though on how to use that tool: https://youtu.be/WmyQHbqB6eg
While setting up your audience, pay attention to the speedometer indicator Facebook has provided on the top right corner of the page. Make sure the indicator stays in the green zone, preferably pointing upwards vertically.
For your budget, you shouldn’t set anything less than $20 per day. Anything less will not be effective enought to gather enough data.
Once you’re done setting up your ad, make sure to let it run for at least a week.
Step 3: Stepping things up
Assuming you set up your ads properly and allow it to run for at least a week, you should have gathered enough data for this next step.
In this next step, you want to create a new audience based on everyone who has visited your website since your ad started.
For these new ads, your objective should be one or 2 steps further down your conversion funnel.
So using the funnel we established above, that would be Add to Cart or Checkout
Note that you should keep your previous ads running so you still have new leads coming to that you can keep funneling your latest ads to.
You should already start receiving orders or conversions by the time your new ads are up for a day or two if everything is properly setup.
Step 4: Cashing in big
Now, we create the final set of ads targeting the both audiences generated from your previous ads and making the objective the highest in your conversion funnel.
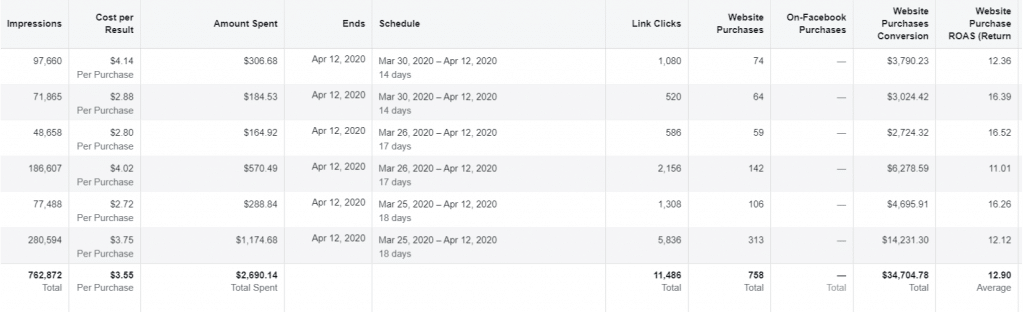
This chain is what I’ve used over the years and the results have been outstanding. See below for a screenshot of results on my latest ads as I wrote this article.
Step 5: Optimize, rinse and repeat
Now that you’ve had time to run your ads for a while, you must be noticing what works and what doesn’t. Based on your observations, you need to continuously keep optimizing your ads, reusing what works and ditching what doesn’t.
That’s it!
In case you have any questions or need assistance managing your ad campaigns, feel free to reach out using the form on the contact page.
Thanks for reading!